


Best Way to Clean Patio Pavers in St. Augustine: A Safe, Practical Guide

The strongest blast from a pressure washer can leave patio pavers looking cleaner while stripping joint sand or damaging the surface. If algae or mildew keeps returning, more pressure may not be the answer. The best way to clean patio pavers St. Augustine homeowners can use is to match the cleaning method to the stain and paver material while protecting the joints.
That matters in Northeast Florida, where humid conditions can encourage algae and mildew in damp or shaded areas. Rust from irrigation, leaf stains, and white efflorescence can also call for different treatments, so one cleaner won’t suit every problem. This guide explains how to identify common stains, choose an appropriate cleaning approach, and avoid preventable surface or joint damage.
You’ll also learn how local weather affects patio upkeep and what to look for after cleaning, including loose or depleted joint sand. A well-maintained patio depends on careful cleaning, but its long-term condition also rests on sound construction and stable pavers.
Table of Contents
Why patio pavers in St. Augustine get dirty, and what cleaning can damage
Recurring discoloration can make a cared-for patio look neglected, especially when green or dark patches return after washing. In St. Augustine, shade, moisture, leaves, and irrigation overspray can all contribute to visible buildup. The marks may look similar from a distance, but they don’t necessarily have the same cause. Choosing a cleaning method before identifying the stain can create more work or damage.
Start by distinguishing loose surface dirt from growth or deposits embedded in the paver texture. Dust and grit may brush away, while algae and mildew can cling in damp areas. Leaf tannins can leave brown marks, iron in irrigation water may create orange rust stains, and efflorescence can appear as a white, chalky deposit. Appearance offers clues, not certainty. Paver material and finish also affect how a surface responds, so learn about types of pavers and their maintenance before settling on an approach.
Why St. Augustine patios can develop recurring growth and stains
Shaded sections that stay damp are more likely to show organic growth than sunny, open areas. Leaves and other debris can hold moisture against the surface and leave tannin marks if they sit for a while. Irrigation overspray may deposit mineral residue or, where water contains iron, rust-colored stains. A green patch, dark spot, or pale film can have several possible sources, so don’t assume every discoloration is ordinary dirt.
That distinction matters because the wrong treatment may not address the cause. Bleach, for example, can worsen rust stains. Scrubbing a mineral deposit as if it were loose soil may also be ineffective. Check the paver’s material and condition, observe where the stain appears, and begin cautiously. The goal is to remove buildup without changing the paver’s finish or disturbing the joints.
What can go wrong when pavers are cleaned too aggressively?
A concentrated pressure stream can etch or roughen some paver surfaces, remove color unevenly, and blast joint sand from between units. The result may be blotchy rather than clean, with sand loss that leaves joints exposed. A narrow stream concentrates force on a small area. Gentle brushing spreads contact across the surface and gives you more control.
There isn’t one pressure setting that suits every patio. Paver material, surface wear, joint condition, nozzle, and equipment all affect the risk. Even a surface that appears sturdy may have vulnerable edges or depleted joints. Don’t assume that a stronger spray is more effective or that a method used on one patio is safe for another.
Good paver cleaning protects both the visible surface and the joints that help keep the patio stable. Before washing, look for loose units, missing sand, or worn areas. If the surface is sound, begin gently and assess the result before increasing cleaning intensity. This is the practical foundation of the best way to clean patio pavers St. Augustine homeowners can use: identify the likely stain, account for the patio’s condition, and avoid preventable damage.
How to clean patio pavers safely: a practical step-by-step method
A careful cleaning routine starts with inspection, not a pressure washer. Before choosing a method, check whether the discoloration is loose soil, organic growth, or a stubborn stain. Also look for signs that the patio needs attention beyond cleaning. For St. Augustine homeowners, a measured process helps protect the surface, joints, nearby plants, and any existing sealer.
Prepare the pavers, joints, and surrounding area
Move patio furniture and planters so you can see the full surface and work without obstacles. Sweep away leaves, grit, and loose debris first. Then inspect for rocking pavers, low or missing joint sand, visible sealer, and delicate planting nearby. These details can change which cleaning approach is appropriate. Note vulnerable areas before you start scrubbing or rinsing.
Clean gently and rinse before residue dries
Work in manageable sections so you can control where cleaner and rinse water go. Wear gloves, eye protection, and stable footwear, and follow the cleaner’s label for use and safety directions. If a product’s compatibility with the paver or sealer isn’t clear, don’t assume it is suitable.
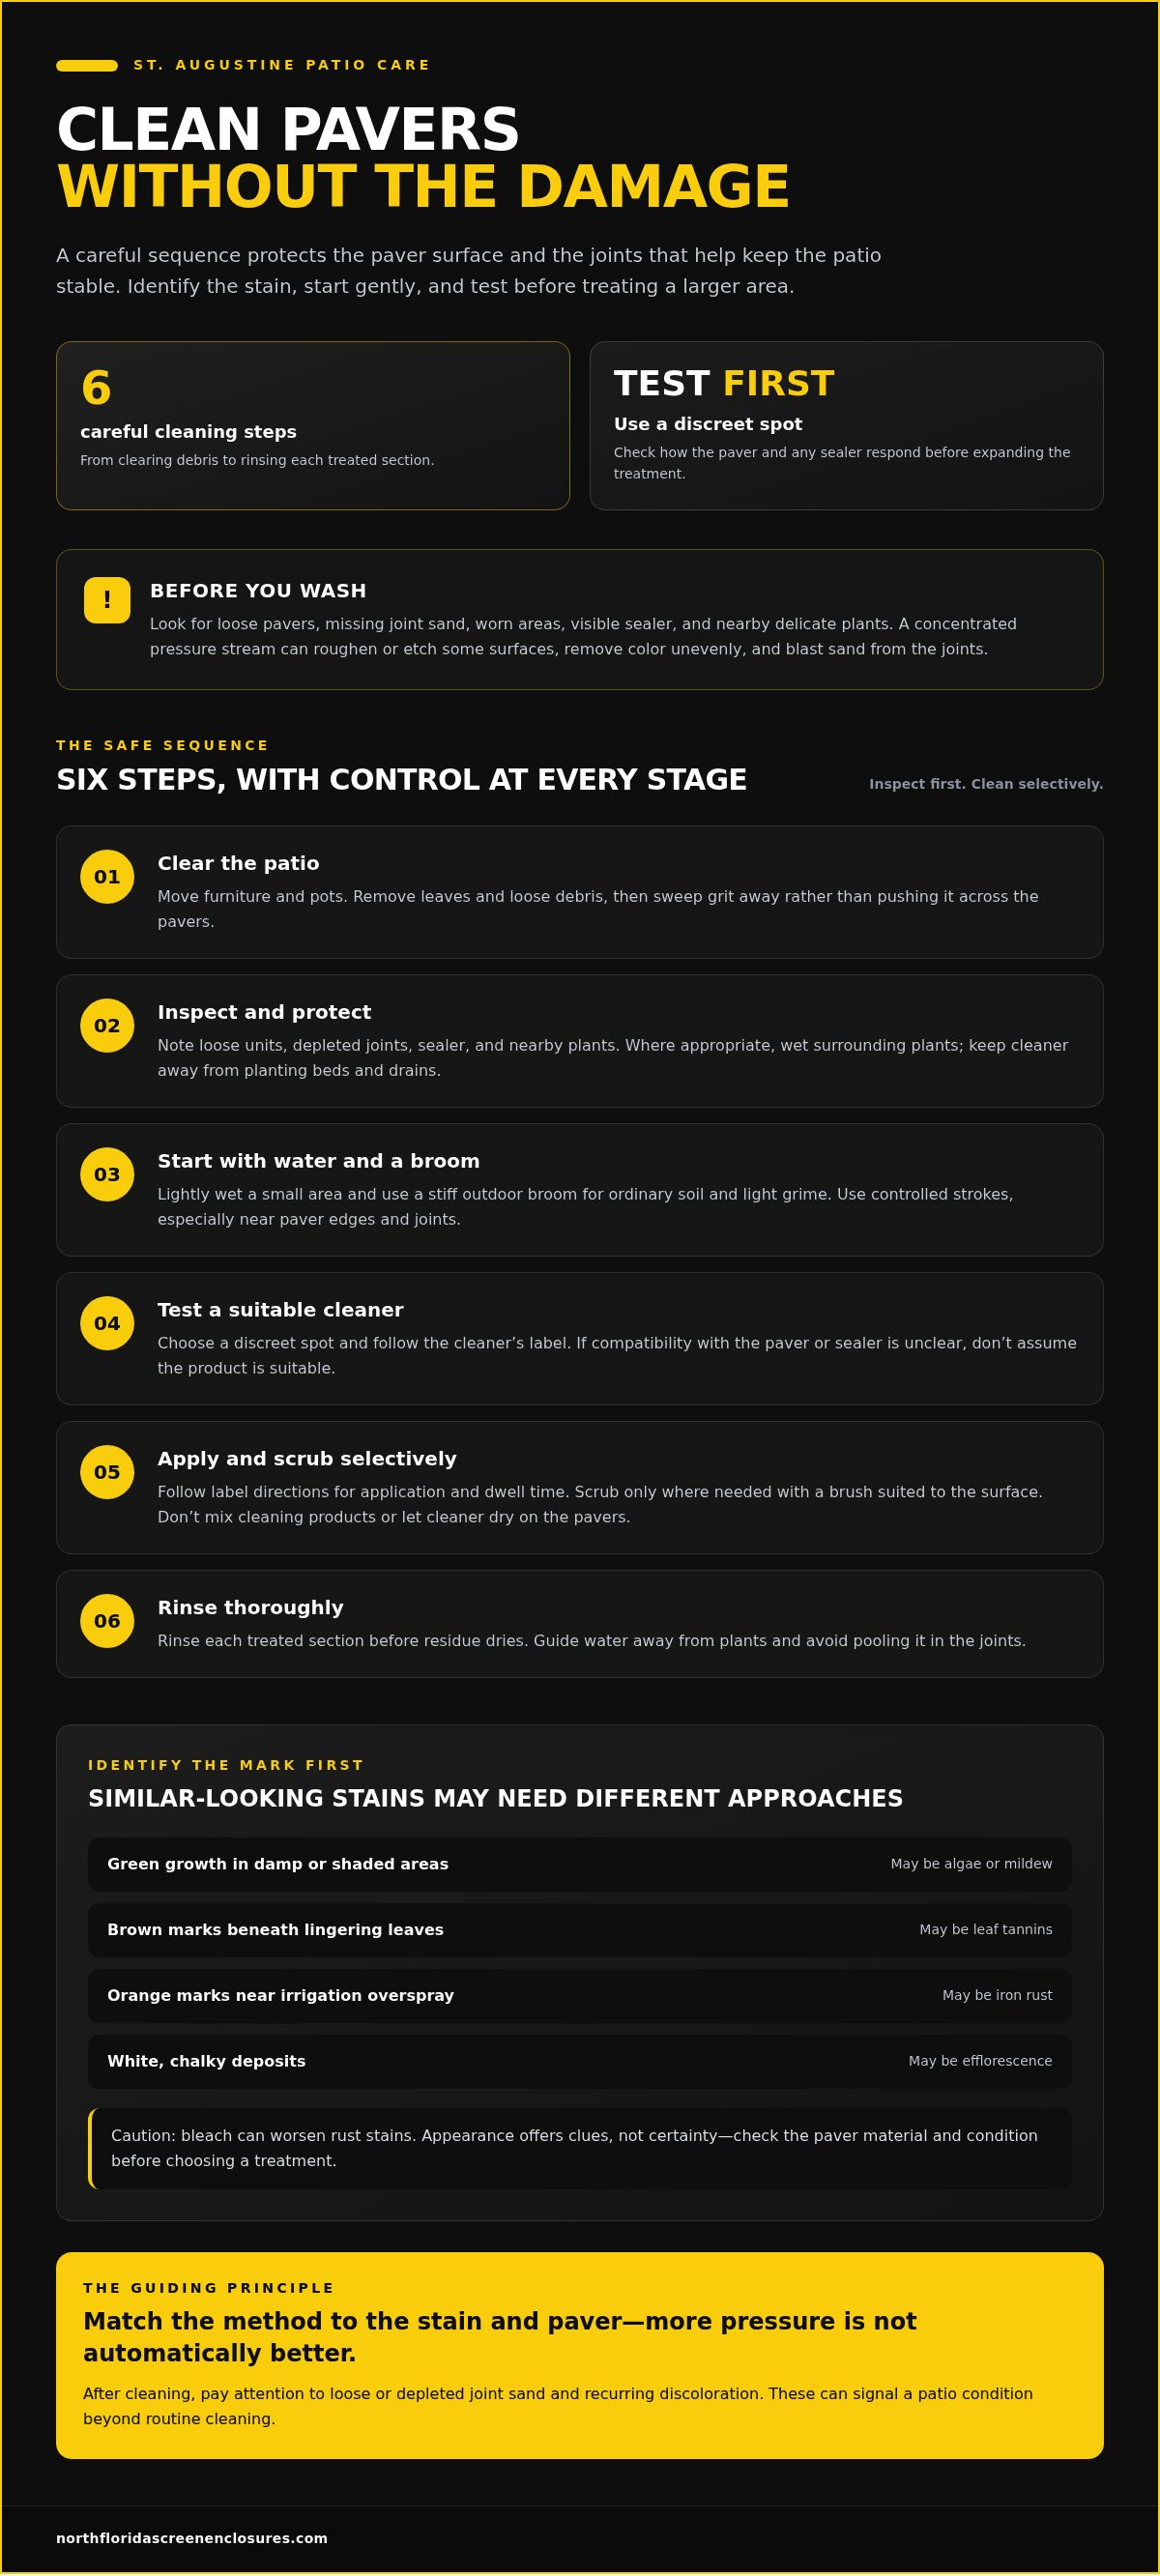
Clear the patio. Remove furniture, pots, leaves, and loose debris. Sweep grit away rather than pushing it across the surface, where it may scratch some finishes.
Inspect and protect. Note loose pavers, depleted joints, sealer, and nearby plants. Where appropriate, wet surrounding plants before cleaning. Keep cleaner from lingering around planting beds or flowing into drains.
Start with water and a broom. Lightly wet a small area and use a stiff outdoor broom to loosen ordinary soil and light grime. Use controlled strokes rather than forceful scrubbing, especially around paver edges and joints.
Test before applying cleaner widely. Select a discreet spot and use a surface-compatible cleaner exactly as its label directs. Give the test area time to show how the paver and any sealer respond before treating a larger section.
Apply and scrub selectively. Follow label directions for application and dwell time. Scrub only where needed, using a brush suited to the surface. Avoid mixing cleaning products or letting cleaner dry on the pavers.
Rinse thoroughly. Rinse each treated section before residue dries, guiding the water away from plants and preventing it from pooling in the joints. Check the surface and joints as you go. If residue remains, reassess the stain and product directions instead of immediately increasing force.
The safest sequence is to clear debris, inspect the patio, test a compatible cleaner, scrub gently, and rinse residue away promptly. It’s a sound starting point, though results vary with the stain, paver material, surface condition, and product used. If your inspection reveals loose units or a layout issue, the concern may call for more than washing. A well-planned paver patio design and construction supports the function and condition of an outdoor living space over time.
Which patio paver cleaning method works for each stain?
Choosing a cleaner by color alone can lead to a poor match. Green growth, brown leaf marks, orange rust, dark grease, and white mineral deposits have different sources. A treatment that suits one may be ineffective or harmful on another. Use the table as a cautious starting point, not as a substitute for checking the paver material, condition, and cleaner label.
Organic growth, leaves, and everyday grime
Sweep leaves and grit first so debris doesn’t become trapped under a brush. For light grime or surface growth, water and gentle scrubbing can be a sensible first step. Removing visible algae won’t change the damp shade or other conditions that encourage it to return. Before switching to a stronger treatment, check that it suits the paver and any sealer.
Clay, concrete, and natural stone can respond differently to cleaning chemistry, and finishes may vary even within a material category. The right approach for St. Augustine homeowners depends on both the stain and the particular surface, rather than a single all-purpose remedy.
Rust, oil, and white mineral deposits
Orange irrigation marks may be rust, dark spots may be oil or grease, and a chalky film may be efflorescence. These call for separate diagnosis, not one cleaner applied across the patio. Read the label for material compatibility and directions, then test a discreet spot before treating a larger area. Don’t mix products or assume a treatment safe for concrete will suit clay or natural stone.
If a stain remains after a careful, label-directed spot treatment or covers a broad area, pause before repeating or intensifying the process. Persistent discoloration may need assessment beyond routine DIY cleaning, particularly if pavers or joints also appear worn or unstable.
How to keep St. Augustine patio pavers cleaner between washes
Between-wash care doesn’t need to follow a fixed calendar. A shaded patio beneath trees may collect leaves and stay damp, while an open area may mainly need occasional sweeping. In St. Augustine, let the patio’s actual conditions guide your routine: notice where moisture lingers, where irrigation reaches the pavers, and where debris tends to gather. Small, regular checks can help you spot buildup before it becomes a larger cleaning task.
Build a routine around the patio’s actual conditions
Pay extra attention to sections that stay shaded or damp, especially after rain. Sweep away leaves promptly, and clear food crumbs or grill residue after outdoor meals. Organic debris left on the surface can hold moisture and leave marks. If irrigation repeatedly sprays the pavers, adjust the direction where practical so overspray is less likely to leave deposits. These habits help limit residue without requiring a universal washing schedule.
After outdoor use: Clear food, drink, and grill residue before it dries or gets tracked across the patio.
After leaves fall: Sweep leaves and fine debris from the surface and joints so they don’t remain damp against the pavers.
After rain or irrigation: Observe where water collects, where growth returns, and whether overspray leaves visible marks.
During routine use: Notice changes in joint sand, paver alignment, or surface appearance rather than waiting for the next deep clean.
Sealing may help protect some pavers, but it isn’t an automatic step for every patio. Suitability depends on the paver material, current surface condition, and the sealer’s directions. A coating applied to an unsuitable or poorly prepared surface may not address the underlying concern. Treat sealing as a separate maintenance decision, not a substitute for removing debris or understanding why a stain keeps returning.
Check joint sand and paver movement after cleaning
Once the patio has dried, look for joints that appear newly washed out, pavers that shift underfoot, or areas that have become uneven. These signs are different from ordinary surface dirt. Don’t simply sweep replacement sand into every gap: joint systems can vary, and the material used should suit the patio’s construction. If pavers move or the joints keep losing material, the issue may need attention beyond routine cleaning.
Keep surface upkeep and structural concerns separate. Sweeping and careful stain treatment address appearance; they won’t correct movement or an underlying problem with the patio. North Florida Screen Enclosures builds paver patios and outdoor living spaces in St. Augustine. If your concern has shifted from cleaning to the patio’s condition or layout, plan a paver patio project that suits how you use your outdoor space.
When patio paver cleaning points to a bigger patio project
Cleaning can improve the appearance of pavers, but it can’t correct movement, failing joints, or an unsuitable layout. If the same area looks dirty again soon after careful cleaning, consider whether the mark is only a surface issue or part of a wider change in the patio. For St. Augustine homeowners, knowing when to stop treating a condition as a stain and look at the patio itself can save effort.
Signs the patio needs more than a wash
Look for changes in the pavers and joints, not just discoloration. Pay attention to units that shift underfoot, joints that repeatedly lose sand, surfaces that feel uneven, or broad areas with visible deterioration. A single stain may call for a targeted cleaning approach; movement or repeated joint loss points to a different kind of concern.
Visible movement: Individual pavers rock, shift, or no longer sit level with neighboring units.
Recurring joint loss: Sand disappears from the same joints after cleaning or ordinary use.
Uneven areas: A section feels newly raised, dipped, or difficult to walk across comfortably.
Widespread deterioration: Multiple pavers show wear or surface changes that aren’t limited to one isolated stain.
Washing may remove residue, but it won’t stabilize loose pavers or resolve an underlying installation concern. At the same time, don’t diagnose a cause from a stain or a photograph alone. Note what has changed, where it occurs, and whether the issue is limited to the surface or affects how the patio feels underfoot. That distinction helps separate a cosmetic task from a condition or layout concern.
Plan a durable paver patio for your outdoor living space
For a new patio or a substantial improvement, consider how the space will be used alongside material, layout, and water movement. A dining area, a walkway, and a gathering space may have different practical needs. Planning these details together can help the patio serve its intended purpose and support its long-term function. For more background, explore the Florida paver patio design and installation guide.
North Florida Screen Enclosures builds paver patios and provides hardscaping and concrete work as part of outdoor living construction in St. Augustine. If cleaning has revealed movement, recurring joint problems, or a layout that no longer works for your household, a construction conversation may be more useful than another wash. Homeowners planning a new or improved outdoor space can explore paver patio and hardscaping solutions that suit their project.
Make your patio a better fit for what comes next
A clean patio can be a good starting point, but lasting enjoyment also depends on how well the space fits your home and daily routines. If cleaning reveals a concern with movement, joints, or the patio’s layout, consider whether a repair or a thoughtfully planned outdoor space is the more useful next step. St. Augustine homeowners can protect the existing surface while recognizing when the patio itself may need attention.
North Florida Screen Enclosures is locally owned and operated in Saint Augustine, with paver patios, hardscaping, and concrete work among its offerings. For homeowners considering a new patio or a refreshed outdoor living area, explore options that support how you want to use the space.
Explore paver patios and outdoor living solutions, and take the next step toward an outdoor space that feels cared for and works well for your home.
Frequently Asked Questions
What is the best way to clean patio pavers without damaging them?
Use the gentlest method that addresses the specific soil or stain, and judge the result only after the pavers have dried. Start with a small, inconspicuous section so you can see whether the surface changes in color or texture. The right approach for St. Augustine homeowners also depends on whether the pavers are sealed and how much wear they already show.
Can you use a pressure washer on patio pavers?
Yes, but pressure washing can harm pavers if the force is too concentrated or directed at vulnerable joints and edges. There isn’t one pressure setting that suits every surface or machine. If you use a washer, test a discreet area first and watch for sand displacement, roughening, or color change. Stop if you notice damage rather than making repeated passes over the same spot.
How do you remove algae or mildew from patio pavers in Florida?
For a small area, begin by removing debris and gently scrubbing with water and an outdoor brush. If growth remains, choose a cleaner labeled for your paver material and follow its directions, including any precautions for nearby plants. Shaded spots may show growth again if moisture continues to linger, so observe whether the same area stays damp after rain or irrigation.
What cleaner should you use on concrete, clay, or natural stone pavers?
Choose a cleaner whose label specifically allows use on the paver material and any existing sealer. Concrete, clay, and natural stone can respond differently to cleaning ingredients, so don’t assume a product suitable for one is safe for another. Test a hidden spot, follow the directions, and avoid combining cleaners. If the material is uncertain, pause before applying a chemical treatment across the patio.
How do you remove rust or irrigation stains from patio pavers?
First, consider whether the orange mark is rust from irrigation or another type of deposit. Use only a stain treatment labeled as suitable for the paver material, and try it on a discreet spot before treating the visible area. Avoid bleach on suspected rust, since it can make that stain worse. If the discoloration persists or spreads, don’t keep escalating the treatment without reassessing its cause.
Why does joint sand wash out when patio pavers are cleaned?
Joint sand can be displaced when rinse water or a pressure stream is directed into the gaps with too much force. It may also be easier to remove if joints were already low or loose before cleaning. Check the joints after the surface dries. If sand loss keeps recurring or pavers begin to move, treat it as a patio condition concern rather than simply replacing material without considering the joint system.
How often should you clean patio pavers in St. Augustine?
There isn’t a single schedule that fits every St. Augustine patio. A shaded area beneath trees may need debris swept away more often than a sunny, open space. Use visible buildup, leaf fall, food spills, and damp areas to guide light upkeep, and reserve deeper cleaning for when the surface needs it. Frequent strong washing isn’t a substitute for routine sweeping and observation.

Comments